Stock Market Learning Index
Complete guide to master stock market trading with color-differentiated, structured modules.
Foundation & Technical Analysis
8 ModulesStock Market Basics
What is stock market and how it works?
Market Terms
All important market terminology
Trade Types
Intraday, delivery, BTST & swing
Trading Styles
Scalping, momentum, position trading
Candlestick Patterns
Bullish, Bearish & Continuation patterns
Chart Patterns
Technical chart patterns and breakouts
Support & Resistance
Key price levels & supply-demand zones
Market Analysis
Technical, Fundamental & Price Action
Advanced Concepts & Derivatives (F&O)
6 ModulesFutures & Options
Derivatives ecosystem & F&O overview
Futures Trading
Margin, lot size, expiry & contracts
Options Trading
Calls, Puts & option payoff strategies
Options Buying
Call & Put buying, Greeks, time decay
Options Selling
Premium collection & writing strategies
Smart Money Concept
Order blocks, liquidity pools & fair value
Chart Patterns Mastery
Master the art of reading price charts and predicting market movements through pattern recognition with the RBC framework (Reversal, Breakout, Continuation).
Pattern Geometry & Measured Move Calculator
 Structure Geometry
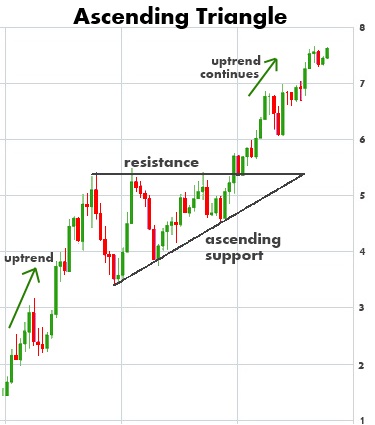
Ascending Triangle Pattern
A horizontal upper resistance line connecting equal swing highs and an ascending lower trendline connecting higher swing lows. Price compresses with declining volume before an explosive upward breakout.
Volume contracts progressively during compression, then expands by at least 150%+ on the breakout candle.
Measure the vertical distance of the triangle at its widest opening and project that upward from the breakout point.
The RBC Pattern Framework
Classifying all price structures into three functional states
Reversal Patterns
Signals the exhaustion of the prevailing trend (e.g. Double Tops, Head & Shoulders) and the onset of a new opposing direction.
Breakout Formations
Represents volatility expansion where price escapes tight compression boundaries with volume expansion (e.g. Ascending Triangles).
Continuation Formations
Temporary consolidations or breathers before the prior dominant trend re-asserts itself (e.g. Bull/Bear Flags, Pennants).
All Chart Patterns
Showing 12 patterns matching your criteria
Ascending Triangle Pattern
A horizontal upper resistance line connecting equal swing highs and an ascending lower trendline connecting higher swing lows. Price compresses with declining volume before an explosive upward breakout.
Volume: Volume contracts progressively during compression, then expands by at least 150%+ on the breakout candle.
Target: Measure the vertical distance of the triangle at its widest opening and project that upward from the breakout point.
Descending Triangle Pattern
A flat horizontal support floor paired with a declining upper trendline connecting lower swing highs. Buyers weaken as sellers establish lower peaks, leading to an eventual high-volume breakdown.
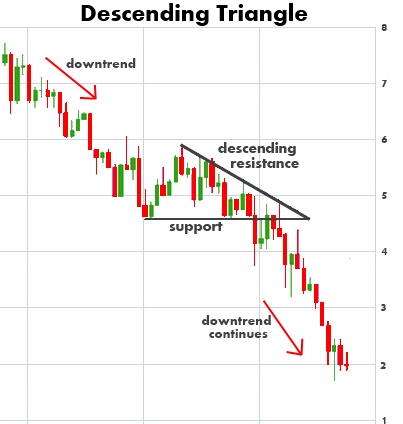
Volume: Volume typically dries up as price approaches the apex, followed by a surge of liquidation volume on breakdown.
Target: Measure the height of the back of the triangle and project downward from the support breakdown line.
Bullish Flag Pattern
An impulsive upward move (the flagpole) followed by a short-term downward sloping parallel consolidation channel (the flag) on diminished volume. Upper breakout resumes the trend with equal vigor.
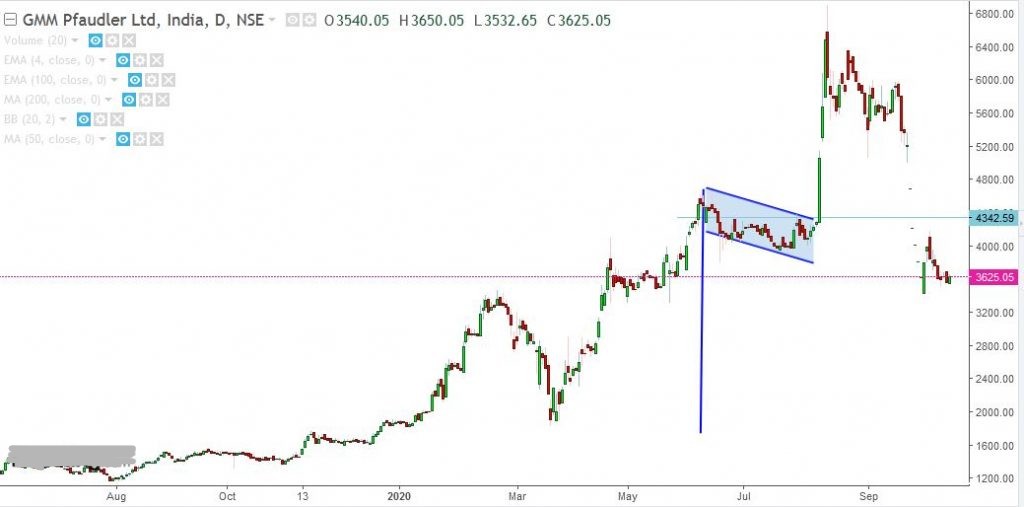
Volume: Heavy volume on the pole, light volume during flag drift, and a sharp spike when the upper trendline is cleared.
Target: Project the full height of the flagpole from the lowest point of the flag consolidation.
Bearish Flag Pattern
The inverse of the bull flag. An aggressive downward selloff succeeded by a shallow upward-drifting counter-trend consolidation. Breakdown below the lower flag line triggers a rapid drop.
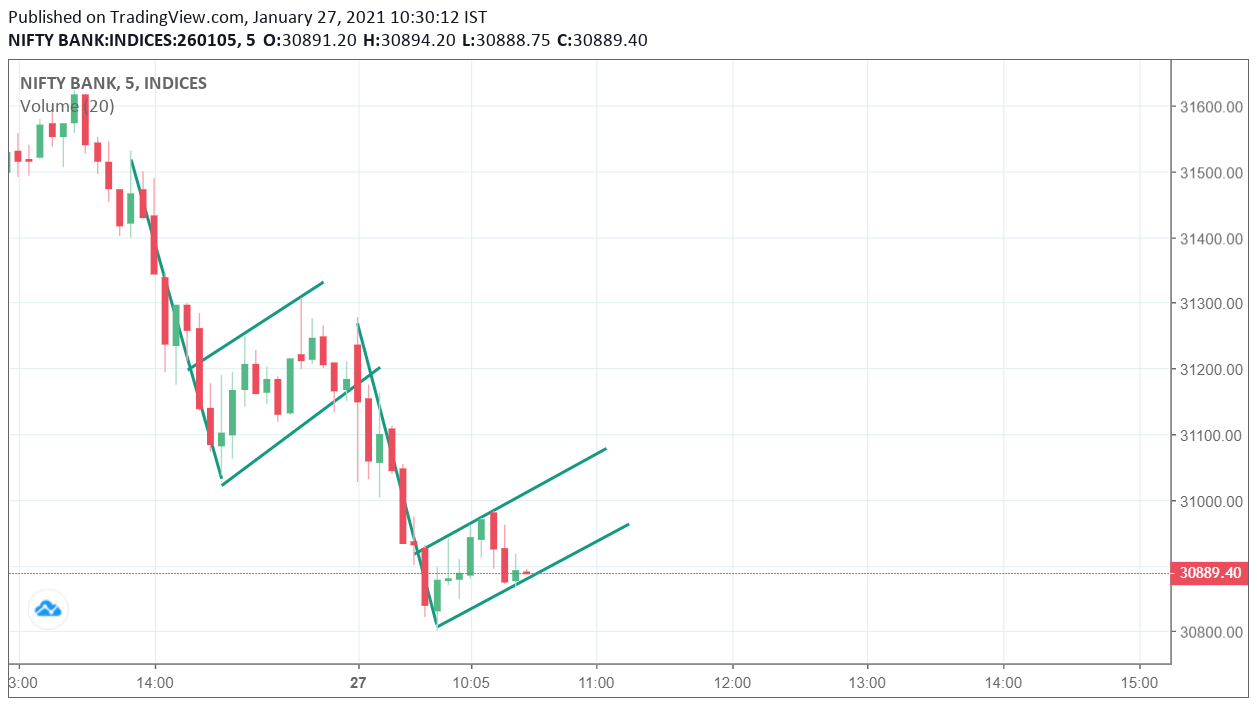
Volume: High selling volume on the drop, declining volume on the bounce, high volume on the breakdown.
Target: Project the length of the downward flagpole from the highest point of the flag consolidation.
Bullish Falling Wedge
Price contracts inside converging downward-sloping trendlines. Lower lows are printed, but at a diminishing pace compared to lower highs, indicating gradual seller exhaustion.
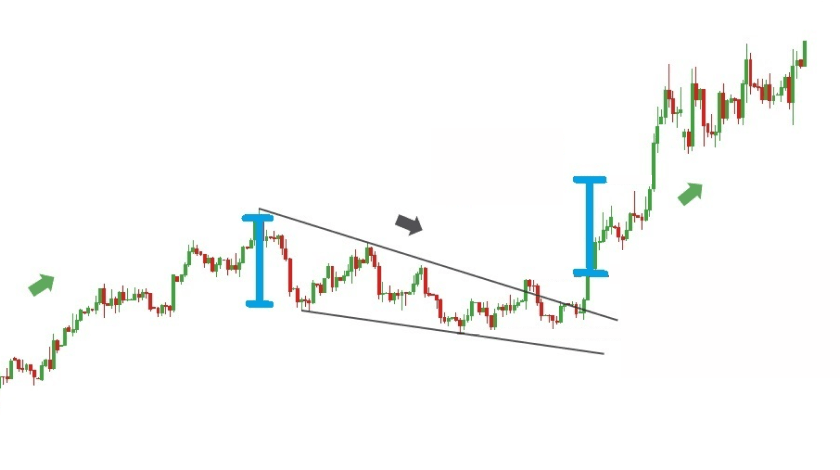
Volume: Volume steadily decreases as the wedge tightens and expands substantially on upper breakout.
Target: Initial target is the origin of the wedge (the swing high from which the pattern originated).
Bearish Rising Wedge
Forms within converging upward-sloping trendlines where both highs and lows are rising, but buyer momentum is steadily diminishing. Precedes a sharp downward breakdown.
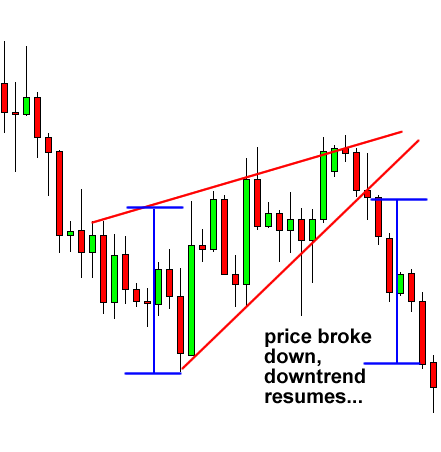
Volume: Volume tends to fall as prices climb into the wedge apex, signaling exhaustion of institutional demand.
Target: Project to the base of the wedge where the lowest swing low started.
Double Top (M Pattern)
Price tests a prominent resistance barrier twice without penetrating. The confirmation trigger is a decisive close below the intervening valley (the neckline).
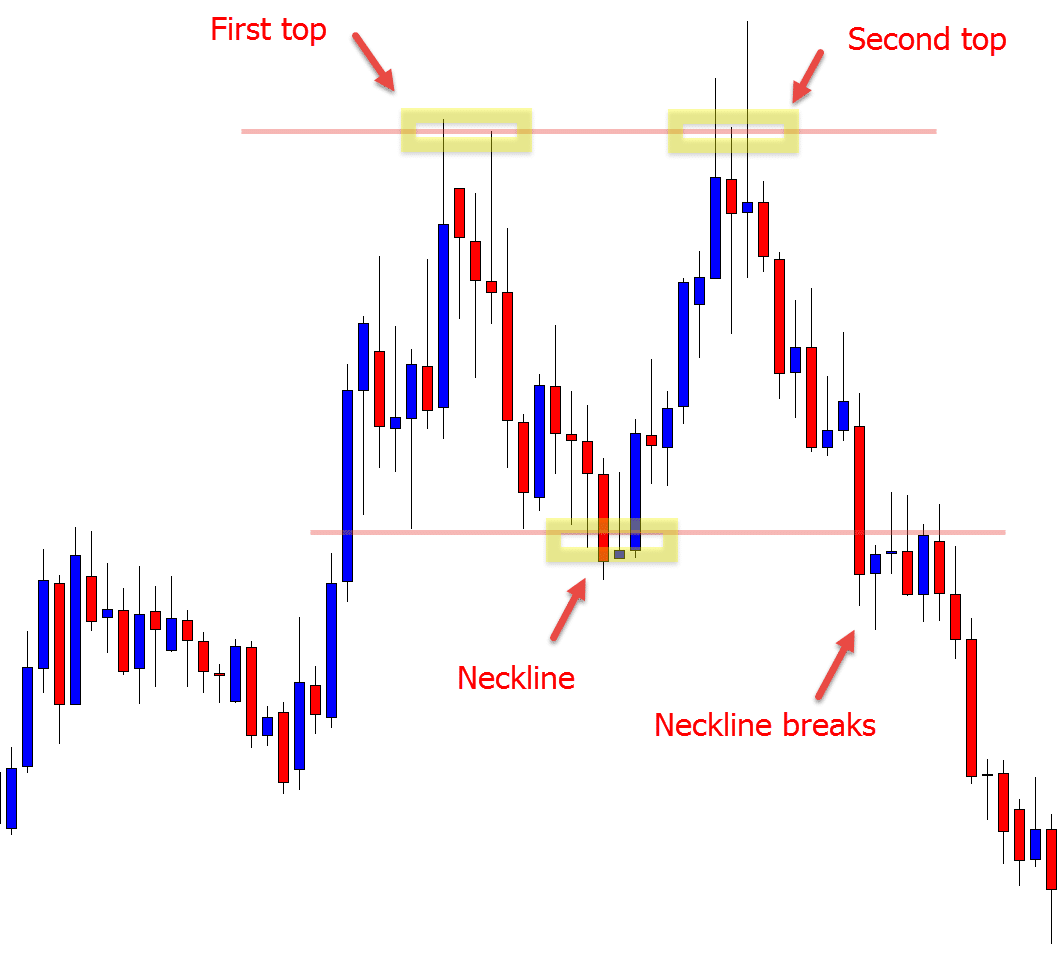
Volume: Peak two typically prints on noticeably lighter volume than peak one, demonstrating lack of follow-through.
Target: Measure from the peak of the tops to the neckline, and project that distance down from the neckline breakdown.
Double Bottom (W Pattern)
Forms when price bounces off an identical support floor twice. The confirmation trigger is a decisive close above the intervening peak (neckline), initiating a fresh upward cycle.
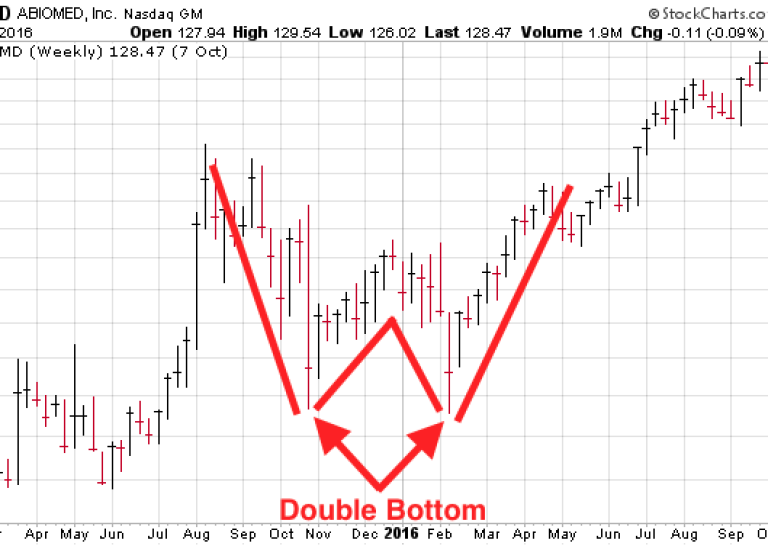
Volume: Second bottom bounce usually brings expanding volume that peaks as the neckline is cleared.
Target: Measure height from trough to neckline and project upward from the neckline breakout.
Triple Top Pattern
A rarer, more reliable top reversal where price fails to pierce resistance three distinct times. Volume consistently diminishes on each successive peak.
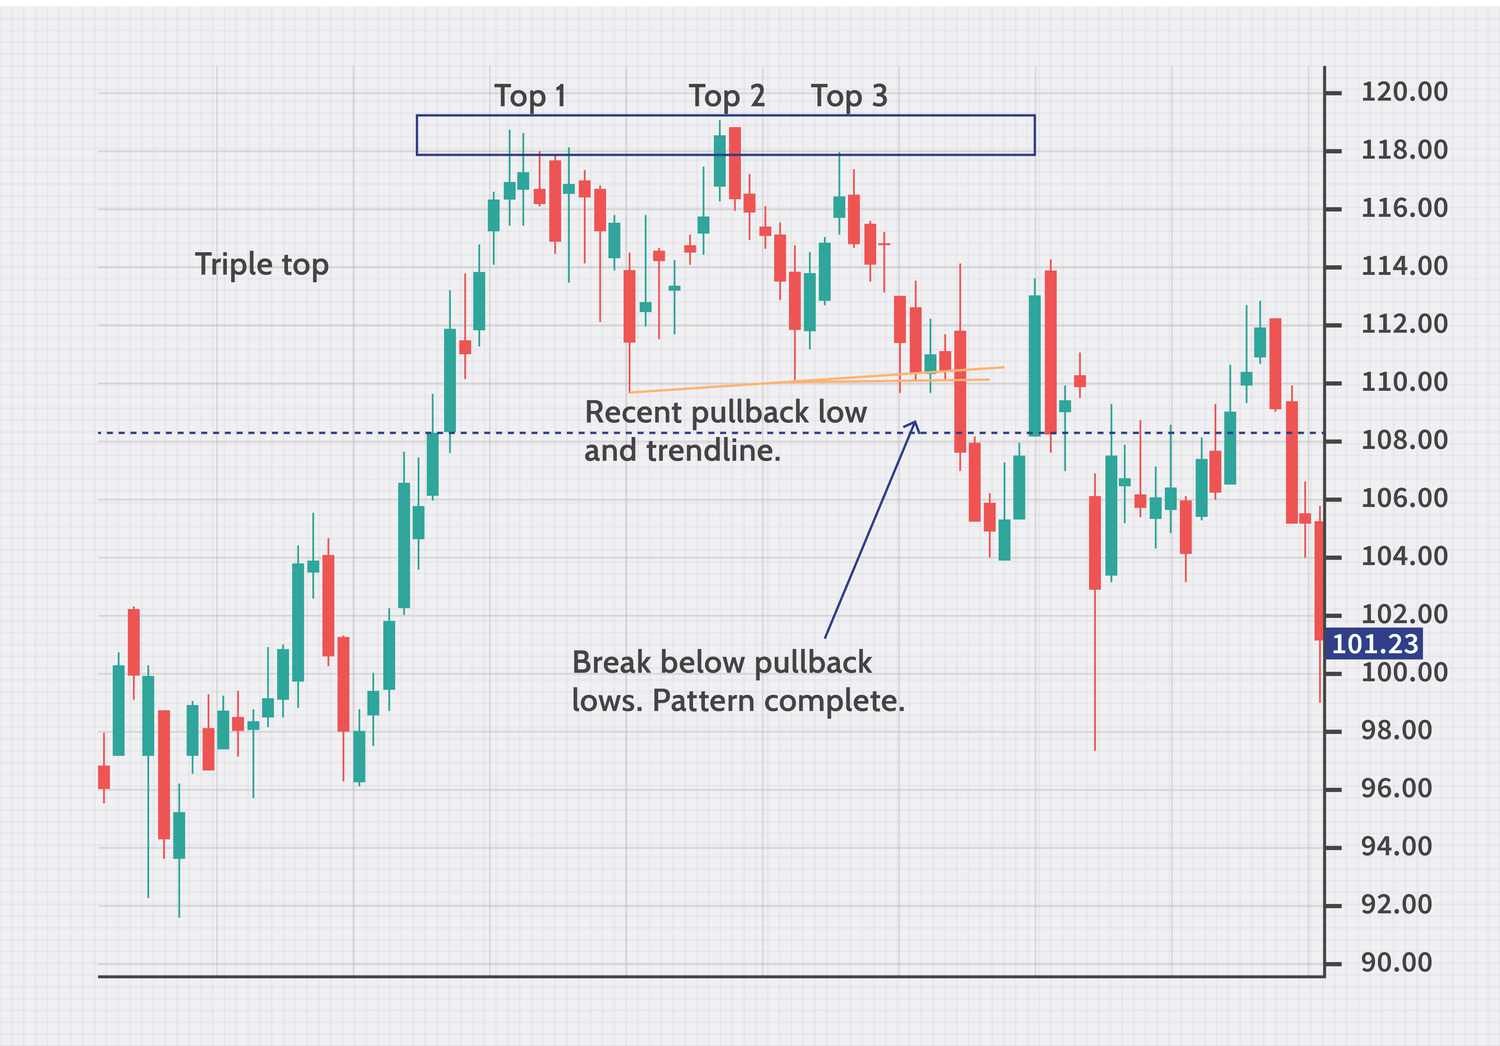
Volume: Progressively diminishing volume across peaks 1, 2, and 3, followed by a volume surge on breakdown.
Target: Measure the height between the peak ceiling and valley floor, projected downward from the break point.
Triple Bottom Pattern
Mirror of the triple top. Bulls defend a clear support barrier across three separate tests. Volume expands noticeably as the third bounce clears upper resistance.
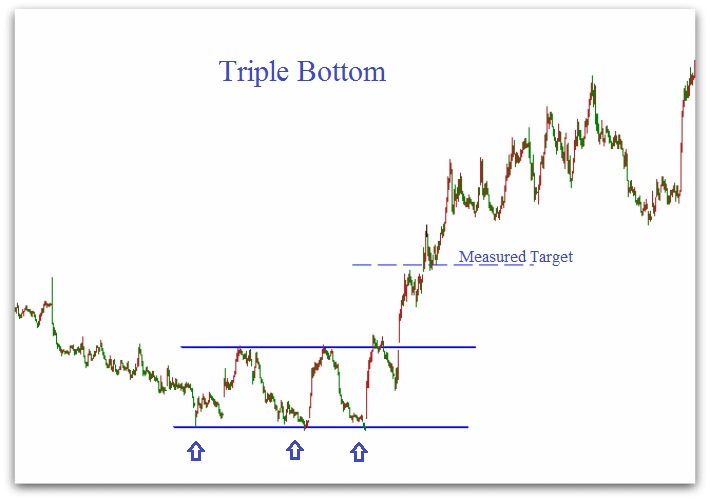
Volume: Low volume on test three, surging volume on the neckline breakout.
Target: Height of the formation projected upward from the breakout neckline.
Head & Shoulders Pattern
One of the most revered technical formations: a left shoulder peak, a higher head peak, and a lower right shoulder peak connected by a neckline. Neckline breakdown signals major regime change.
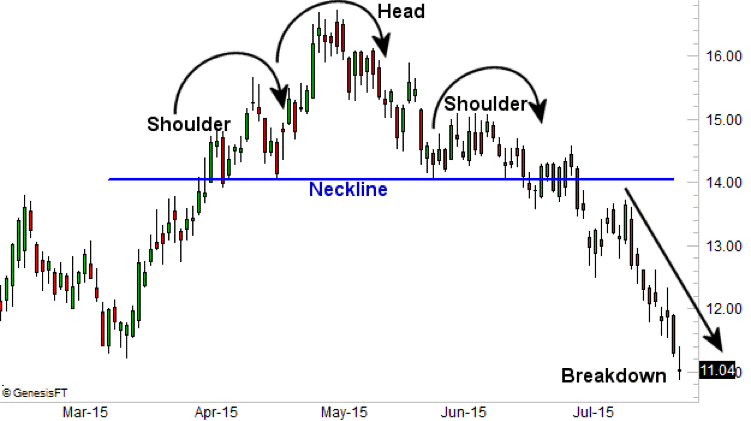
Volume: Left shoulder has highest volume; head has moderate volume; right shoulder has very low volume. Neckline break brings heavy volume.
Target: Measure the vertical distance from the top of the head down to the neckline, and project that distance down from the breakdown point.
Inverse Head & Shoulders
Appears at major cyclical bottoms: a left trough, a lower head trough, and a higher right trough. The neckline breakout confirms transition from supply domination to active institutional accumulation.
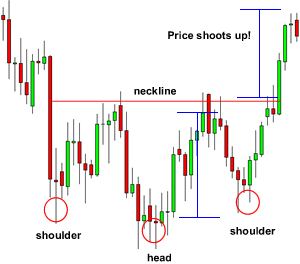
Volume: Right shoulder forms on drying volume; neckline breakout is fueled by aggressive volume expansion.
Target: Measure depth from the bottom of the head up to the neckline, and project upward from the breakout point.
Essential Pattern Trading Rules
Rules that separate disciplined traders from emotional trading mistakes
1. Never Anticipate the Breakout
Wait for the breakout candle to close definitively beyond the pattern boundary. Entering inside the pattern exposes you to false wick stops.
2. The Retest Entry Technique
Disciplined traders often take partial size on the initial breakout, and add remaining size on the low-volume retest of broken support/resistance.
3. Volume Divergence Validation
A breakout occurring on declining volume is an immediate red flag denoting weak follow-through rather than genuine market participation.
4. Timeframe Hierarchy
Patterns on daily charts take precedence over 15-minute patterns. Never trade against the higher-timeframe trend direction.
5. Multi-Indicator Confluence
Combine chart patterns with RSI divergence, moving average slopes, and key order blocks to elevate win rate from 55% to 75%+.
6. Defined Risk-to-Reward Ratio
Ensure the distance to your measured move target is at least 2.5x the distance to your stop loss. Asymmetric reward is how accounts grow.